Tuesday, November 23, 2010

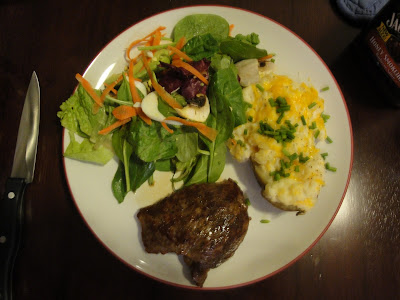
Steak and Twice Baked Potatoes


Twice Baked Potatoes
2 large potatoes
2 oz. cream cheese, softened
1/8 c. sour cream
2 Tbl milk
1 Tbl butter, softened
1/4 c. shredded cheddar cheese
salt and pepper to taste
chives

1.  Scrub potatoes well, pierce with a fork 3 or 4 times and wrap in tinfoil.  Bake in preheated oven at 400 degrees for 1 hour. 
2.  When baked and softened, slice in half.  Remove the insides, careful to not break the skin, leaving about 1/4 inch to protect the skin and preserve the shape.  ( I discovered that a medium cookie scoop works really well to remove the insides, the edges are sharper and the rounded scoop is less likely to break the skins than a spoon). 
3.  Mash the insides with cream cheese, sour cream, milk, butter, salt and pepper.  Place the mixture back into the skins and top with cheddar cheese. 
4.  Bake at 375 degrees until puffy and cheese is melted. 
5.  Garnish with chives. 

 Steak

I have only cooked steak once before in my life, and it was a sorry attempt on the stovetop in college.  This time, I googled how to cook a steak and found a technique that suited my liking on foodnetwork.com.  The directions I used are as follows: 


1. Place 10 to 12-inch cast iron skillet in oven and heat oven to 500 degrees. Bring steak(s) to room temperature.
2. When oven reaches temperature, remove pan and place on range over high heat. Coat steak lightly with oil and season both sides with a generous pinch of salt. Grind on black pepper to taste.
[  DO NOT FORGET THAT YOUR PAN JUST CAME FROM A 500 DEGREE OVEN!!  I made this mistake and grabbed the handle of my pan as I was cooking the steak and burned my fingers a pretty good one.  ]
3. Immediately place steak in the middle of hot, dry pan. Cook 30 seconds without moving. Turn with tongs and cook another 30 seconds, then put the pan straight into the oven for 2 minutes. Flip steak and cook for another 2 minutes. (This time is for medium rare steaks. If you prefer medium, add a minute to both of the oven turns.)
4. Remove steak from pan, cover loosely with foil, and rest for 2 minutes. Serve whole or slice thin and fan onto plate.

Despite my terribly burned hand (that recovered by the end of the week) the steak turned out amazing!  This technique is perfect.  Enjoy! 


Monday, November 22, 2010

Shrimp Alfredo


     Let me count the ways I love Shrimp Alfredo... 1) It's fast.  2) It's fancy.  3) Shrimp is good  
Feel free to add on to the list.  I love shrimp.  And I love Italian food.  And I don't always have a lot of time, so this dish suits me well.

Shrimp Alfredo  (serves 4)
3/4 lb. pasta noodles (angel hair, fettucine, or spaghetti)  
3/4 lb. cooked shrimp - peeled and deveined 
1-2 red peppers (depending on how much you love veggies!) 
1/4 onion
3/4 to 1 jar (16 oz.) alfredo sauce
2 cloves garlic
1 Tbl dried parsley
pepper to taste 
parmesan cheese 

1.  Cook noodles according to directions. 
2.  While noodles are cooking, saute red peppers and heat shrimp in a skillet over medium heat.  When the red peppers have softened up add the onion, sauce, garlic, parsley, and pepper.  Mix well.  When heated through, combine with noodles.  
3.  Garnish with parmesan cheese. 

Tuesday, November 16, 2010

Chicken Quesadillas


       I bought crushed red pepper recently for a pasta dish and I noticed that on the back of the bottle it had a delicious sounding recipe for chicken quesadillas.  I was NOT disappointed!  I couldn't stop raving about these quesadillas all through dinner, and I still think about them regularly.  My husband is lucky I have to cook something different every night otherwise I would be tempted to have these every week! Anyway, enough talking it up, I might get your hopes too high!  It's still a quesadilla guys.  [The best one you'll ever eat though!] 

Chicken Quesadilla Recipe
2 c. cooked chicken, cubed or shredded
2 c. cheddar cheese
1 c. chopped tomato
1/4 c. chopped green onions
1/2 tsp. Crushed red pepper
1/2 tsp. allspice (I think I used season all, same thing??) 
1/2 tsp. thyme [this is key!]

1.  Spread each ingredient evenly on 4 (8 in.) tortillas.  Top each with another tortilla.  Lightly brush with oil.  Sprinkle with paprika (or sprinkle it on the inside, I think that's what I did). 
2.  Bake in 350 degree oven 10 minutes or until cheese melts. 

Here's another view of the inside: 


Now go make some quesadillas!!  They are so fast and did I mention delicious?!

Thursday, November 11, 2010

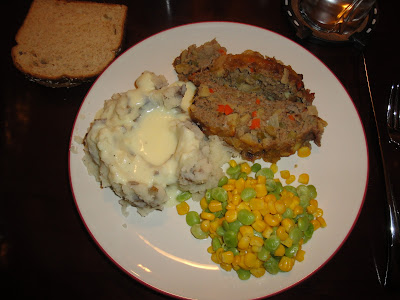
Tangy Apple Turkey Loaf


I cooked with ground turkey for the first time in my life.  It was a spectacular introduction!  I LOVE sweet flavoring with my meat and I found this incredible recipe on allrecipes.com that hit the spot!  Here's what you'll need for the meatloaf: 


  • 1 tablespoon and 3 teaspoons butter
  • 2 stalks celery, finely chopped
  • 1 small onion, chopped
  • 1/4 teaspoon salt
  • 1 carrot, grated or chopped
  • 1 apple - peeled, cored and chopped
  • 1 lb. ground turkey (or chicken)
  • 1 egg
  • 4 tablespoons applesauce
  • 1 tablespoon and 1 teaspoon milk
  • 1/2 cup and tablespoon dry bread crumbs
  • 1-1/2 teaspoons poultry seasoning
  • 1/2 teaspoon ground sage
  • 1/4 teaspoon salt
  • 1/8 teaspoon ground black pepper
  •  
  • 4 Tbl applesauce
  • 2 teaspoons Dijon mustard
  • 1-1/2 teaspoons honey

1.  Pre-heat oven to 400 degrees. 
2. Melt the butter in a skillet over medium heat, and cook the celery, carrot, and onion with 1/8 teaspoon of salt, stirring occasionally, until the onions are soft and browned, about 12 minutes.  Stir in the apple, and remove the mixture from the heat.
3. In a mixing bowl, lightly mix together the ground chicken, egg, 4 Tbl. of applesauce, milk, bread crumbs, poultry seasoning, sage, 1/8 teaspoon of salt, and black pepper. Mix in the cooked vegetable-apple mixture. Form the mixture into a loaf, and place into the center of a 9x12-inch baking dish. 
4. In a bowl, mix together 4 Tbl. applesauce, the Dijon mustard, and honey into a smooth mixture, and spread the glaze over the top and sides of the meat loaf.
5. Bake in the preheated oven for 30 minutes, then reduce the temperature to 375 degrees and cook about 25-30 more minutes. Allow the loaf to rest for 5 minutes before serving.  

     Again, I believe I packed in more seasoning than the recipe called for but that's my own preference!  I served it with lima beans and corn.  I bought a bag of lima beans a while back, remembering how much I liked them as a kid.  After serving them as a side dish alone, I was rather disappointed and wondered how on earth we were going to eat the whole bag! Then, I remembered that the only way I had ever eaten lima beans was from a can, mixed with corn!  So, now I love lima beans again... as long as they are mixed with corn.  :) 
     I also served it with homemade mashed potatoes and gravy.  Funny experience with the gravy - everything was getting done at the same time and I was so pleased that I had timed everything so well.  I added about a tablespoon of cornstarch to the gravy after mixing it with a bit of milk (an important part of cooking with cornstarch - always dissolve it in something cool before pouring it into a boiling mixture, otherwise it will just clump together) in order to thicken it up.  Immediately my pan of gravy foamed up and became very white.  I was intrigued.  This had never happened before.  Why on earth had my gravy turned into a volcano?!  I looked down.  I laughed out loud.  I had just put a heaping tablespoon of BAKING POWDER into my gravy!  They were right next to each other in my cupboard, same shaped canister, same consistency, I didn't even notice! So, I dumped the whole thing down the sink and started over.  I was too amused to be upset, and hey, the volcano effect was pretty cool!  

Pizza!

     I grew up in a home where homemade pizza was a staple in the family diet.  Everyone raved about my parents' pizza and it gained quite the reputation over the years among our friends.  Well, I had been craving pizza for about 10 days so we ordered pizza Sat. night and Sun. night I still hadn't had enough so I decided the time had come to break in our pizza stone that we got as a wedding present.  
    I began with the crust.  Our pizza stone came with 2 packages of crust mix so this time I didn't make it from scratch.  So, I don't have a recipe to post, but you can google a recipe or use a dough recipe from your bread maker book, if you have one.  I threw the dough mix together into my bread machine and pushed the button to mix it up.  Once it was mixed I took it out, and ended up adding extra flour because it was still too sticky.  I rolled it out on the table and then sprinkled the pizza stone with cornmeal to keep the crust from sticking.  Jackson helped me form the dough into an even circle, which was more complicated than you would think.  Be sure as you get the dough onto your stone or pan, to leave at least 1 inch of space to the edge to allow for the dough to expand while baking.  
      I think the key to good homemade pizza is the sauce.  I found a recipe online that I adjusted to my own liking: 
Pizza Sauce
1/2 (15 oz) can tomato sauce
1/2 (6 oz) can tomato paste
1 1/2 Tbl oregano
1/2 tsp. basil
1 1/2 tsp. garlic powder
2 tsp. paprika


1.  Mix everything together in a bowl.  Taste test.  (I actually never measure spices.  I just throw them in until it looks good and taste it for confirmation) Add more seasoning if desired.  Spread onto pizza dough. 
2.  Add toppings of your choice!  The pic below was taken when I was half-way done topping the pizza... 
                                          
 
We made half of the pizza with ham and pineapple, topped with mozzarella cheese and the other half we loaded up with pepperoni, mushrooms, onion, green pepper, pineapple, ham, and olive (leaving the olive off of my slice of pizza... that's the beauty of homemade pizza, you can individualize EVERY slice!), and topped with lots of mozzarella.


3.  Bake 15-20 min. in pre-heated oven at 400 degrees.  

We pulled it out of the oven and were really surprised at how much the crust had expanded! It looked amazing though and tasted just as good as it looked! 


Sunday, November 7, 2010

Wontons and Sweet and Sour Chicken over Rice


       I had planned on making wontons last night but when I pulled up the recipe around 5 PM, I saw that the filling had to sit for 6-8 hours in order to let flavors set in.  So, I pushed it back a day and made them tonight.  Jackson was a good sport and helped me fill the wonton wrappers since it is rather time consuming.  After the first wonton wrapper he burst out with, "I hate this!  This is an example of TRUE LOVE, because there's no other way I would do this.  I stink at painting and I hate art because I'm not good at it!" I told him he didn't have to help (even though I REALLY wanted his help to speed up the process), but he persevered.  To make wonton wrappers stick, you have to spread them with egg.  I whipped an egg around with a tiny bit of milk and used a basting brush to brush it around the edges of the wrapper.  With practice, Jackson's "painting" with the basting brush became much more precise and by the end he had figured out how to fold the wrappers so they would stick together AND look pretty.  Check it out: 

       Unfortunately I don't have a picture of what they looked like before (my creation based on reading online directions), but believe me when I say these are the wonton wrapper equivalents of a Michelangelo masterpiece while our first attempts were more like the playdough creation of a 2 year old. Anyway, here's the recipe for tonight's Asian masterpiece: 

Wontons (Recipe made about 25 wontons)
1/3 lb. ground pork
1/4 head of large cabbage, chopped
1/3 can of water chestnuts
1 tsp. salt
ground ginger to taste
1/2 tsp. white sugar
1 tsp. sesame seed oil
Package of wonton wrappers
1 egg whisked with 1 tsp. milk

1.  Chop cabbage and water chestnuts and fry in a skillet along with the pork. 
2.  When pork is cooked through and cabbage is tender, remove from heat and transfer to a bowl.  Add salt, ginger, sugar, and sesame seed oil.  Refrigerate for 6-8 hours. 
3.  Using a basting brush, brush edges of each wonton wrapper with milk mixture to moisten edges.  Place 1-2 tsp. of meat mixture in the center of the wonton wrapper.  Place opposite corners together and squeeze with fingers,  Bring the other two corners to the center and squeeze them together with the first corners.  4 seams are created, squish those together with your fingers to seal the wonton. It should look like the picture above. 
4.  Heat 3 Tbl. olive oil in a skillet over medium heat.  Place wontons in skillet and fry until they start to brown (no more than 2-3 min).  Add 3/4 c. water and cover skillet with lid.  
5. Let wontons steam for 7-8 min or until water is almost evaporated.  Remove lid and flip wontons.  Fry for about 30 seconds more and remove wontons, placing them on a paper towel.  
6.  Choose your dipping sauce, we used teriyaki sauce tonight. 

Sweet and Sour Chicken over Rice (serves 3 to 4)
1 c. uncooked rice
1 Tbl olive oil
1/2 green pepper, chopped
2 stalks of celery, chopped
1/4 yellow onion, chopped
1 chicken breast, chopped
salt and pepper 
About 2 oz. tomato paste, or to taste
1/2 c. water
2 Tbl and 2 tsp. rice vinegar (or white)
1/8 c. white sugar
1/4 can of pineapple tidbits
2 tsp. corn starch

1.  Cook rice according to package directions.
2.  Heat oil in a skillet over medium heat.  Add green pepper, celery, onion, and chicken. Season with salt and pepper to taste. Sautee until chicken is cooked through and vegetables are tender.  
3.  In small sauce pan, combine water, tomato paste, vinegar, sugar, pineapple and corn starch.  Mix well while heating on medium high.  Bring to a boil, reduce heat to low.  Add chicken mixture and mix well.  
4.  Serve the sweet and sour sauce over rice. 


Thursday, November 4, 2010

Brazilian Chicken with Coconut Milk

  
     My favorite part of this picture is the plastic silverware on either side of the plate.  Yes, we washed and re-used plastic silverware while waiting for our silverware to be shipped to us from Bed Bath and Beyond.  After a few weeks of plastic silverware, it seemed rather normal to me.  But then our silverware arrived and I remembered what real forks felt like!  Anyway, I found a Brazilian Chicken recipe on allrecipes.com but only had about half of the ingredients so I adjusted it to use what I had. Below is my version of the recipe:

Brazilian Chicken

2 boneless chicken breasts
1 tsp cumin
1 tsp chili powder
salt and pepper to taste
1 Tbl ginger
2 Tbl olive oil
1 onion chopped
1 green pepper chopped
1/2 to 1 red pepper chopped
3 tomatoes chopped
minced garlic to taste
1 can coconut milk
chopped cilantro

1.  Salt and pepper the chicken breasts to taste.  Mix cumin and chili powder and rub all sides of chicken breasts. 
2.  Heat 1 Tbl olive oil in skillet and cook chicken on medium high until no longer pink.  In separate skillet, use remaining 1 Tbl. olive oil and cook onion, green pepper, red pepper, and garlic until tender.  Add tomatoes, coconut milk, and ginger and cook for about 8 more minutes on medium heat. Add cilantro to taste in the last few minutes of cooking. 
3.  Serve over rice and garnish with cilantro.  

I also served chips and guacamole on the side.  Kind of random but my husband and I LOVE chips and salsa as well as chips and guacamole.  Dinner had an excellent flavor and I can't wait until I can make this again!  Looks like I'll have to make a new breakfast sometime so I can repeat this dish in the evening! 


BBQ Beef with Cucumber Sunomono

     
     Since beginning this 365 day challenge, I have come to LOVE my slow cooker.  It is amazing to come home from work and have dinner ready to eat!  Sometimes I prepare dinner the night before and then just stick it in the slow cooker in the morning before leaving.  Anyway, I have never made shredded BBQ beef and we had some hamburger buns to use up so it sounded like a good idea.  I found a promising recipe on allrecipes.com (my LIFESAVER, I think 90% of my recipes come from this site). So here's the recipe:

BBQ Beef:

Chuck Roast ( I believe mine was 1.85 lbs )
2 Tbl flour
1 can of tomato sauce
1 chopped onion
4 Tbl brown sugar
2 tsp. beef bouillon
1 tsp. chili powder
2 tsp. minced garlic
1 tsp. mustard powder

1.  Rub the roast down with flour and then salt and pepper it to taste
2.  Mix everything else and pour over meat in the slow cooker.
3.  Cook on high for 8 hours - At about 7 or 7.5 hours, remove the roast and shred.  I used two forks and just pulled it all apart and then replaced it in the slow cooker, mixing it well to coat the meat with the sauce and allow the flavoring to soak into the meat.

     I'm not one for measuring precisely.  These are estimates based off of the original recipe, but I tend to add a lot more seasoning than a recipe calls for because I love a good strong flavor.  After getting the meat going I also made the cucumber sunomono.  Apparently those vinegar soaked cucumbers that your mom made with the extra cucumbers from a garden, are actually called Sunomono and is a Japanese dish.  Well anyway, here's the recipe for the marinade:

2 large cucumbers, peeled and sliced
1/3 c. rice vinegar
4 tsp white sugar
1 tsp salt
1/2 tsp ginger (it called for 1 1/2 tsp fresh ginger root but I used what I had in my spice cupboard instead)

Mix all ingredients except cucumbers.  Put in freezer bag, add cucumbers and swish around occasionally to make sure they marinade evenly.   This recipe was delicious that night but my cucumbers got kinda soggy by the 2nd day.  Maybe that's normal, but I don't remember my mom's or mother-in-law's ever going soggy.  When all was said and done, my husband loved the BBQ beef and the cucumbers provided a nice fresh contrast of flavor and color.